

✍️ Week 1 lesson 3 of DataTalksClub 2022 data engineering zoomcamp, set Docker network 🐳🕸️🐳, config and run pgAdmin 👨💻
Today, we will follow DataTalksClub's video: DE Zoomcamp 1.2.3 - Connecting pgAdmin and Postgres.
Which is part of the DataTalksClub 2022 Data engineering Zoomcamp week 1 repo.
In our last post, we learned how to ingest the NYC taxi trip data to Postgres, following DataTalksClub's video: DE Zoomcamp 1.2.2 - Ingesting NY Taxi Data to Postgres.
 Rafael
💬 In this lesson, we will use pgAdmin to access the 🚕 NYC taxi trips data loaded in Postgres. Since we are working with Docker, we don't have to install pgAdmin on our system but pull a Docker image that contains the tool. For this, we will:
- Enable containers to communicate between them by creating and adding them to a network.
1.1 Stop and remove our first Postgres container, to rerun it with the network specs.
1.2 Rerun the Postgres container with the network specs.
1.3 Confirm the NYC taxi trip data is still there with pgcli connecting to the newly created Postgres container. - Run a pgAdmin container with the network specs.
2.1 Configure pgAdmin to connect to the Postgres container.
2.2 Confirm the data is still there with pgAdmin.
This post is part of a series. Find all the other related posts here

🕸️ Network of Docker containers
We are going to have two containers that we want to use simultaneously. One with Postgres and one with pgAdmin. These containers are isolated, but we would like them to be able to see each other. This is accomplished by creating a Docker network and adding the containers. Let's create a network called pg-network by typing in a terminal window the following command
docker network create pg-network🛑 Stop and remove the Postgres container
Before we continue, we need to stop the Postgres Docker container if it is still running. In the terminal running pgcli (from our previous post), type exit and hit Enter to exit pgcli. Then, check if the container is still running with
docker pswhich will return a table similar to the one below if the container with Postgres is still running
CONTAINER ID   IMAGE         COMMAND                  CREATED       STATUS       PORTS                                       NAMES
2e3295311dfe   postgres:13   "docker-entrypoint.s…"   10 days ago   Up 10 days   0.0.0.0:5432->5432/tcp, :::5432->5432/tcp   blissful_bose
To stop it, type
docker stop <CONTAINER ID>replacing <CONTAINER ID> with the ID shown in the table above (2e3295311dfe in our case).
After the container stops, we need to remove it with
docker rm /<CONTAINER NAME>where CONTAINER NAME is the name of the Postgres container, which can be found in the docker ps return table above (blissful_bose in our case).
🐘 Rerun the Postgres container
So far, we've created a Docker network and removed the old Postgres container. Now, we need to create a new Postgres container, specifying that it should run on the newly created network. On a terminal window type
docker run -it \
  -e POSTGRES_USER="root" \
  -e POSTGRES_PASSWORD="root" \
  -e POSTGRES_DB="ny_taxi" \
  -v $(pwd)/ny_taxi_postgres_data:/var/lib/postgresql/data \
  -p 5432:5432 \
  --network=pg-network \
  --name pg-database \
  postgres:13
Note that we passed one network and one name parameter. The value of the network parameter is the name we gave to the newly created Docker network, i.e., pg-network. The value of the name parameter is the network name we are giving to the Postgres container (pg-database), which we will use in pgAdmin to connect to it.
If the docker runcommand above was successful, your terminal will be locked and show the "database system is ready to accept connections" message.
🧮 Confirm the data is still there using pgcli
Since we tinkered (ahem, destroyed) with the original Postgres container, let's check if we can still access the inserted data. Open a terminal and type
pgcli -h localhost -p 5432 -u root -d ny_taxi Enter the database password ("root") when prompted and then, on pgcli, query the table with
SELECT count(1) FROM yellow_taxi_datawhich should return the number of records in the table
root@localhost:ny_taxi> SELECT count(1) FROM yellow_taxi_data;
+---------+
| count   |
|---------|
| 1369765 |
+---------+
SELECT 1
Time: 0.483s
root@localhost:ny_taxi>📦 pgAdmin container
Now we can run the pgAdmin container. First, we find its name on the web. Then we read the instructions for running the image. Note that the image name is dpage/pgadmin4 and that we must specify a couple of environment variables to make it work. On a terminal, type the following to run the pgAdmin image
docker run -it \
    -e PGADMIN_DEFAULT_EMAIL="admin@admin.com" \
    -e PGADMIN_DEFAULT_PASSWORD="root" \
    -p 8080:80 \
    --network=pg-network \
    --name pgadmin \
    dpage/pgadmin4
Note that we specified our network name (pg-network), we gave the name pgadmin to this container, and we bound the host system 8080 port to the container port 80.
If the docker runcommand above was successful, your terminal will be locked and show the "Booting worker with pid: 88" message.
🎚️ Configure pgAdmin
Once the container has booted, open a tab in your web browser and type
localhost:8080Which will take you to the pgAdmin login page
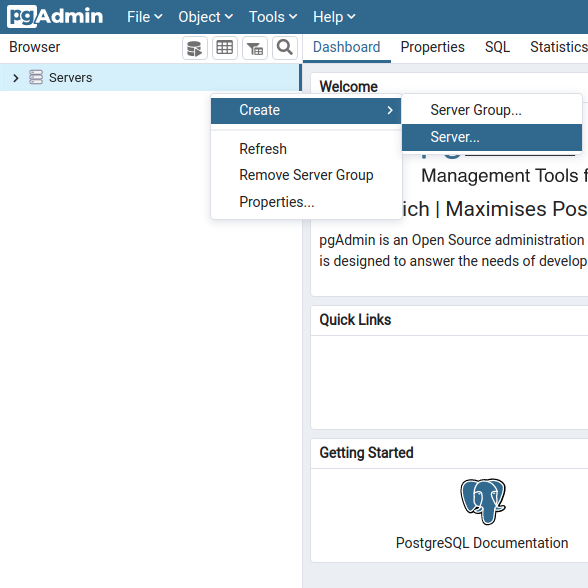
Enter the credentials we specified above when running the pdAdmin container and MB1 on the Login button. This step will take you to the pgAdmin browser page, where we need to create a new server by MB2 on Server > Create > Server..., as shown below
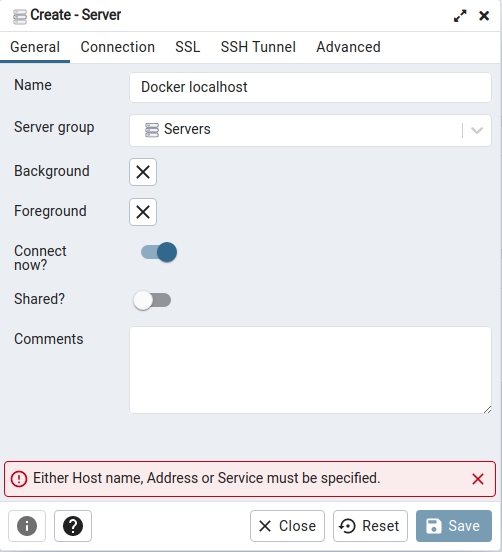
In the General tab, fill the name as shown below
And fill the Connection tab as follows
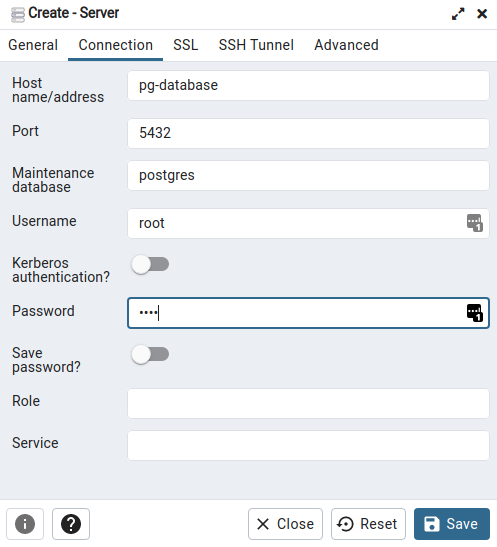
Note that we used the Postgres container network name (pg-network) as the Hostname/address and the database credentials we used to define the Postgres container.
Finally, MB1 on the Save button to store the configuration.
🧮 Confirm the data is still there using pgAdmin
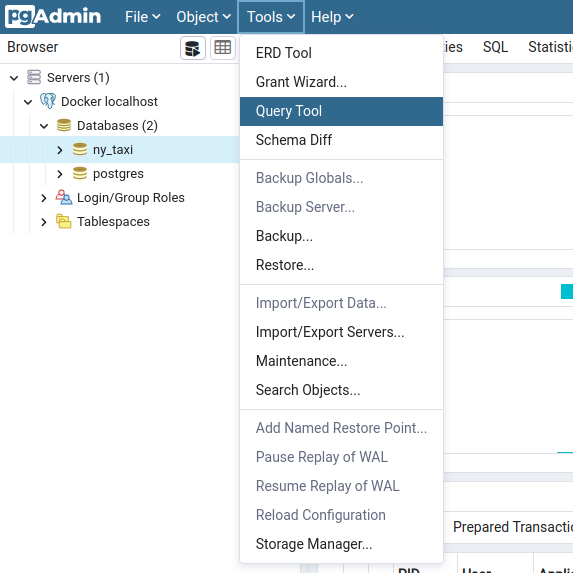
Now, we want to query the ny_taxi table using pgAdmin. For this, expand the tree in the panel until you can select the ny_taxi_data database (MB1 on it to highlight it), and then MB1 on the top bar Tools > QueryTool
We can type our SQL query and then MB1 on the Execute button ▶️ (or press F5) to run the query in the query tool. For example
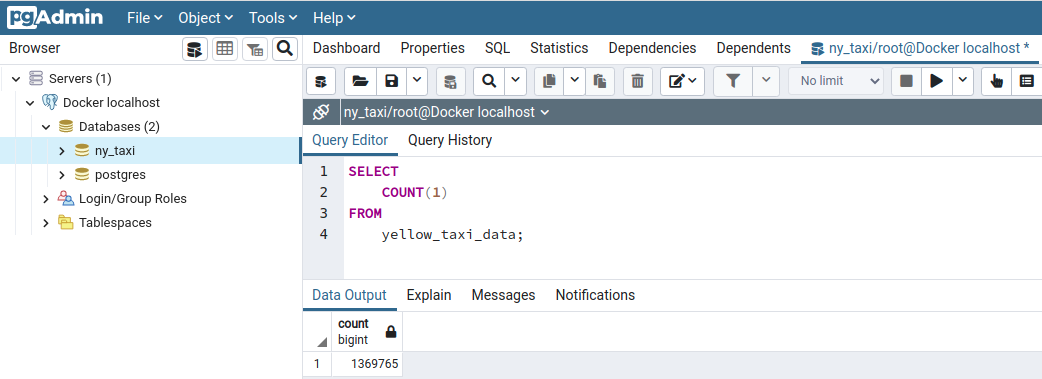
The number of records returned by this query should be the same as those given by pgcli in the previous section (1,369,765). Great Success!
📝 Summary
In this post we:
- Enabled containers to communicate between them by creating and adding them to a network.
1.1 Stoped and removed our first Postgres container to rebuild it with the network specs.
1.2 Reran the Postgres container with the network specs.
1.3 Confirmed the NYC taxi trip data was still there with pgcli connecting to the newly created Postgres container. - Ran a pgAdmin container with the network specs.
2.1 Configured pgAdmin to connect to the Postgres container.
2.2 Confirmed the data was still there with pgAdmin.

In our next lesson, we will convert our data ingestion notebook into a Python script and add it to a container specifying that it should run when the container runs.
