

✍️ Week 1 lesson 2 of DataTalksClub 2022 data engineering zoomcamp, set 🐘 Postgres on 🐳 Docker, Load 🚕 NYC taxi trip data, Read with 🐼 Pandas and pgcli
Today, we will follow DataTalksClub's video: DE Zoomcamp 1.2.2 - Ingesting NY taxi data to Postgres.
Which is part of the DataTalksClub 2022 Data engineering Zoomcamp week 1 repo.
In our last post, we introduced Docker following DataTalksClub video: DE Zoomcamp 1.2.1 - Introduction to Docker

💬 In this lesson, we will:
- Set Postgres on Docker.
1.1 Find a couple of ways setting up can go wrong. - Load one month's worth of data from the NYC taxi trips to Postgres.
2.1 Explore the data file in the terminal.
2.2 Build a table creation string using Pandas.
2.3 Create a Postgres table using Pandas.
2.4 Read and insert the data file in chunks using Pandas. - Access the Postgres database with pgcli.
This post is part of a series. Find all the other related posts here

🐘 Set Postgres on Docker
We will use the official Postgres Docker image (postgres:13). To properly provision the database, we must set a few environment variables. We will do this with the docker run command, adding the -e flag before the environment variable name.
docker run -it \
  -e POSTGRES_USER="root" \
  -e POSTGRES_PASSWORD="root" \
  -e POSTGRES_DB="ny_taxi" \
  postgres:13
Postgres needs to keep files in a filesystem to store and retrieve the data. Since we are using containers, and these don't keep the state, we need to allow Postgres to access a directory in the host system, i.e., we need to map a directory in the host machine to a directory in the container for keeping the data. The process of pairing these two directories is called mounting.
Let's add a directory called ny_taxi_postgres_data next to the Dockerfile we created last week. Now, we can add the –v flag (mount) to our docker run command mapping this newly created directory to the Postgres data directory in the container (separated by a :). Note that the directories passed to the mounting flag are absolute paths.
docker run -it \
  -e POSTGRES_USER="root" \
  -e POSTGRES_PASSWORD="root" \
  -e POSTGRES_DB="ny_taxi" \
  -v ($pwd)/ny_taxi_postgres_data:/var/lib/postgresql/data \
  postgres:13
Finally, since there will be communications between the host and the container, we need to map a port in the host machine to a port in the container. We do this with the –p flag passing port 5432. Similar to the directory mounting, when specifying the port, the value before the colon corresponds to the host and the value after to the container.
docker run -it \
  -e POSTGRES_USER="root" \
  -e POSTGRES_PASSWORD="root" \
  -e POSTGRES_DB="ny_taxi" \
  -v ($pwd)/ny_taxi_postgres_data:/var/lib/postgresql/data \
  -p 5432:5432 \
  postgres:13
Running this command successfully will return a message with "database system is ready to accept connections" and the terminal will be locked.
2022-02-23 04:07:58.541 UTC [1] LOG:  starting PostgreSQL 13.5 (Debian 13.5-1.pgdg110+1) on x86_64-pc-linux-gnu, compiled by gcc (Debian 10.2.1-6) 10.2.1 20210110, 64-bit
2022-02-23 04:07:58.542 UTC [1] LOG:  listening on IPv4 address "0.0.0.0", port 5432
2022-02-23 04:07:58.542 UTC [1] LOG:  listening on IPv6 address "::", port 5432
2022-02-23 04:07:58.594 UTC [1] LOG:  listening on Unix socket "/var/run/postgresql/.s.PGSQL.5432"
2022-02-23 04:07:58.751 UTC [28] LOG:  database system was shut down at 2022-01-31 22:59:01 UTC
2022-02-23 04:07:58.883 UTC [1] LOG: database system is ready to accept connections⚠️ Things that can go wrong
Other Postgres installations could be using the same port, which will create a conflict when running the docker image. This is possible in a couple of ways:
🗓️ Previous Postgres installation in the Host system
If you had installed Postgres in your local system before, it is probably running in the background. If this is the case, and you run the command above, you will get the error message below.
docker run -it \
  -e POSTGRES_USER="root" \
  -e POSTGRES_PASSWORD="root" \
  -e POSTGRES_DB="ny_taxi" \
  -v ($pwd)/ny_taxi_postgres_data:/var/lib/postgresql/data \
  -p 5432:5432 \
  postgres:13
docker: Error response from daemon: driver failed programming external connectivity on endpoint crazy_northcutt (c00687384f1caf9652f1deaf9ba41489049a8aa6d766b3d49160a33ca5e8d380): Error starting userland proxy: listen tcp4 0.0.0.0:5432: bind: address already in use.
To double-check, we can run the sudo lsof -i :5432 command
sudo lsof -i :5432
COMMAND   PID     USER   FD   TYPE DEVICE SIZE/OFF NODE NAME
postgres 1347 postgres    3u  IPv4  37286      0t0  TCP localhost:postgresql (LISTEN)
If you see a Postgres process running like in the snippet above, we can kill it with:
sudo pkill -u postgres📦 Other containers running with Postgres
If Postgres is already running in one of the containers, we need to stop it. First, we find the container ID by running docker ps and then we stop it with docker stop <CONTAINER id>.
🔎 Access the database with pgcli
For the commands in this section to work, Postgres must be running, that is, the long docker run command from the last section (with all the flags) should have been executed successfully and locked your terminal. As a result, we will first open a new terminal before typing any new command.
We will use pgcli (a Python library) to access the Postgres database from the command line. You can install it with
pip install pgcliOnce installed, we can launch it with
pgcli -h localhost -p 5432 -u root -d ny_taxiEnter the database password defined in the previous section without the quotes ("root"). This step will grant us access to the database.
pgcli -h localhost -p 5432 -u root -d ny_taxi
Password for root:
Server: PostgreSQL 13.5 (Debian 13.5-1.pgdg110+1)
Version: 3.3.1
Home: http://pgcli.com
root@localhost:ny_taxi>
Since we haven't added any tables or data, there is not much to do, but we can test the database connection. Try typing the command for listing tables in the database
\dtAnd you will see that there are no tables in our ny_taxi database.
root@localhost:ny_taxi> \dt
+--------+------+------+-------+
| Schema | Name | Type | Owner |
|--------+------+------+-------|
+--------+------+------+-------+
SELECT 0
Time: 0.030s
root@localhost:ny_taxi> 🚕 Load NYC taxi trip data to Postgres
The NYC Taxi and Limousine Commission (TLC) provides data pertaining to historical taxi trips in New York City on their website. Records include pick-up and drop-off dates/times, pick-up and drop-off locations, trip distances, itemized fares, rate types, payment types, and driver-reported passenger counts. The data is organized by years, starting from 2009 to 2021 (last year). Each month of each year, the data is provided as a CSV file for yellow taxis, green taxis, for-hire vehicles, and high volume for-hire vehicles. For developing our data pipeline we will start with the yellow taxi trip records for January 2021.
In addition, TLC provides the Trip Record User Guide and Yellow Trips Data Dictionary that we can use to understand the data and meaning of the recorded variables. Finally, we can use the Taxi Zone Lookup Table to lookup the LocationID for each pick-up and drop-off location, translating abstract ID numbers into relatable places in NYC (boroughs or zones).
To download the yellow taxi trip records for January 2021, open a terminal window, navigate to the directory containing the Dockerfile, and then type
wget https://s3.amazonaws.com/nyc-tlc/trip+data/yellow_tripdata_2021-01.csv🕵 ️Explore the yellow taxi trip records for January 2021
The downloaded CSV file is quite large (121 Mb), so it could take a while to open in a text editor or spreadsheet. Let's only open a portion of the file with the head command in the terminal window
head yellow_tripdata_2021-01.csvwhich outputs
VendorID,tpep_pickup_datetime,tpep_dropoff_datetime,passenger_count,trip_distance,RatecodeID,store_and_fwd_flag,PULocationID,DOLocationID,payment_type,fare_amount,extra,mta_tax,tip_amount,tolls_amount,improvement_surcharge,total_amount,congestion_surcharge
1,2021-01-01 00:30:10,2021-01-01 00:36:12,1,2.10,1,N,142,43,2,8,3,0.5,0,0,0.3,11.8,2.5
1,2021-01-01 00:51:20,2021-01-01 00:52:19,1,.20,1,N,238,151,2,3,0.5,0.5,0,0,0.3,4.3,0
1,2021-01-01 00:43:30,2021-01-01 01:11:06,1,14.70,1,N,132,165,1,42,0.5,0.5,8.65,0,0.3,51.95,0
1,2021-01-01 00:15:48,2021-01-01 00:31:01,0,10.60,1,N,138,132,1,29,0.5,0.5,6.05,0,0.3,36.35,0
2,2021-01-01 00:31:49,2021-01-01 00:48:21,1,4.94,1,N,68,33,1,16.5,0.5,0.5,4.06,0,0.3,24.36,2.5
1,2021-01-01 00:16:29,2021-01-01 00:24:30,1,1.60,1,N,224,68,1,8,3,0.5,2.35,0,0.3,14.15,2.5
Interesting! Seems like a well-formatted CSV file with many columns. Now let's explore the number of rows in this file using the word count command (wc)
wc -l yellow_tripdata_2021-01.csv
1369766 yellow_tripdata_2021-01.csv
1369766! That's a lot of taxi trips in just one month! Let's grab the first 100 trips and save them to a new file so we can explore them in a spreadsheet program
head -n 100 yellow_tripdata_2021-01.csv > yellow_head.csvNow go to your favorite spreadsheet application and open the newly created yellow_head.csv file
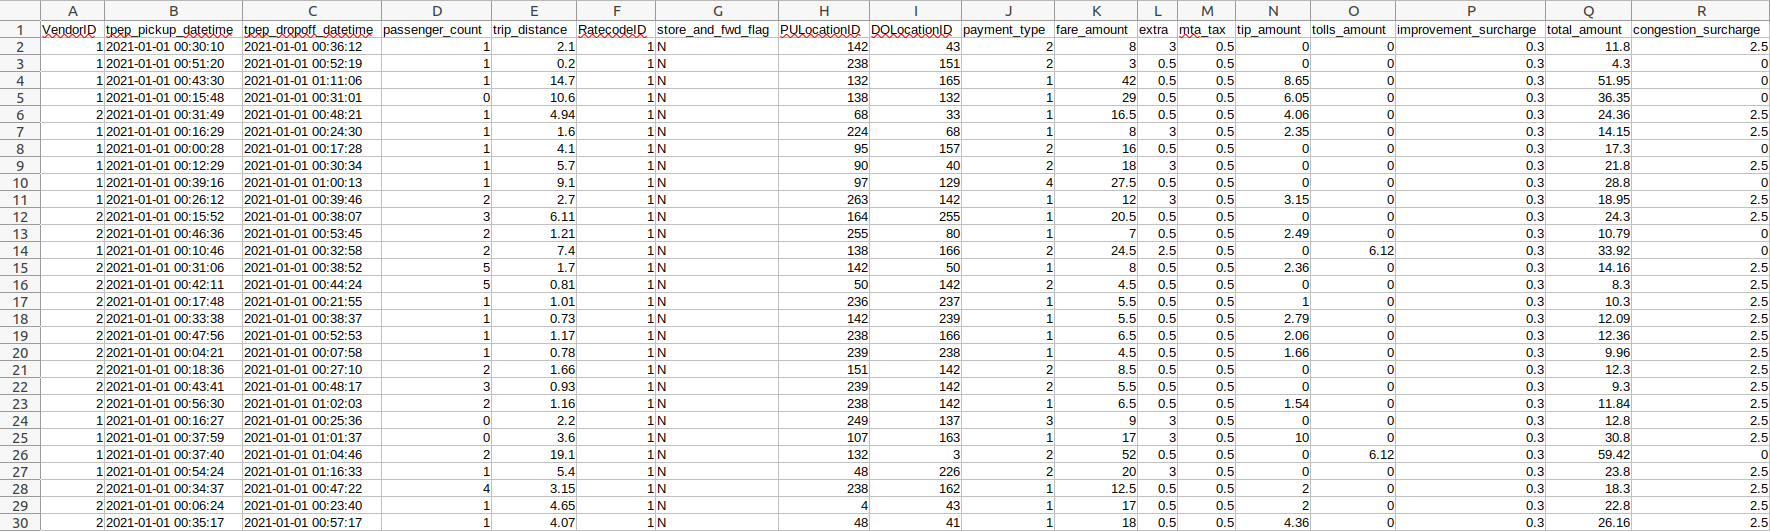
Looking good! Take a moment to admire the ✨data✨. 😍 Isn't it pretty? What columns are numeric in value? Categorical? Time/Datetime? Please write down your answers as we will use them when reading the entire file with Pandas in the next section.
🏗️ Build the table creation string (schema)
Who is ready to start writing some Python code? 🙋 We will create a Jupyter Notebook to work with Pandas to build a table creation string with the schema that makes sense for these data. First, create a new notebook file next to the Dockerfile and name it upload-data.ipynb. Then import Pandas and read the large CSV file. Here, we will tell Pandas which columns to parse as dates, as per our observations in the previous section. Also, note that we are only loading the first 100 rows since the entire file is quite large.
import pandas as pd
df = pd.read_csv(
    'yellow_tripdata_2021-01.csv',
    nrows=100,
    parse_dates=['tpep_pickup_datetime', 'tpep_dropoff_datetime'],
)Let's use the Pandas IO module to create the schema from the dataframe, i.e., to get a SQL table creation string in data definition language (DDL).
print(pd.io.sql.get_schema(df, name='yellow_taxi_data'))Where name is the name of the table we want to create.
Now we need to ensure that the returned DDL is compatible with Postgres. In the .get_schema() function above, we need to pass a Postgres connection. In our case, we will use SQLAlchemy to create this connection as follows
from sqlalchemy import create_engine

engine = create_engine('postgresql://root:root@localhost:5432/ny_taxi')
Here, we have specified the dialect (postgresql), the username and password (root:root), the connection port (5432), and the table name (ny_taxi). Now we can add this engine to the .get_schema() function call.
print(pd.io.sql.get_schema(df, name='yellow_taxi_data', con=engine)) Which returns
CREATE TABLE yellow_taxi_data (
	"VendorID" BIGINT,
	tpep_pickup_datetime TIMESTAMP WITHOUT TIME ZONE,
	tpep_dropoff_datetime TIMESTAMP WITHOUT TIME ZONE,
	passenger_count BIGINT,
	trip_distance FLOAT(53),
	"RatecodeID" BIGINT,
	store_and_fwd_flag TEXT,
	"PULocationID" BIGINT,
	"DOLocationID" BIGINT,
	payment_type BIGINT,
	fare_amount FLOAT(53),
	extra FLOAT(53),
	mta_tax FLOAT(53),
	tip_amount FLOAT(53),
	tolls_amount FLOAT(53),
	improvement_surcharge FLOAT(53),
	total_amount FLOAT(53),
  	congestion_surcharge FLOAT(53)
)We can iterate over the data loading, column type casting, and table creation string steps until the latter looks like what we expect: Each column is associated with the correct variable type. In this way, we know that when we use the .to_sql() method in the next section, the table will be created with the right columns and types.
🧮 Create the table
Now, we will use Pandas to create the data definition (table) in Postgres, and in the next section, we will insert the data. For this, let's use only the header of the dataframe, which we get by passing n=0 to the head method, and leverage the dataframe .to_sql() method.
df.head(n=0).to_sql(name='yellow_taxi_data', con=engine, if_exists='replace')Let's check if this worked with pgcli, by running the following commands:
\dt: List the tables in the database\d yellow_taxi_data: Show the table description
Server: PostgreSQL 13.5 (Debian 13.5-1.pgdg110+1)
Version: 3.3.1
Home: http://pgcli.com
root@localhost:ny_taxi> \dt
+--------+------------------+-------+-------+
| Schema | Name             | Type  | Owner |
|--------+------------------+-------+-------|
| public | yellow_taxi_data | table | root  |
+--------+------------------+-------+-------+
SELECT 1
Time: 0.016s
root@localhost:ny_taxi> \d yellow_taxi_data
+-----------------------+-----------------------------+-----------+
| Column                | Type                        | Modifiers |
|-----------------------+-----------------------------+-----------|
| index                 | bigint                      |           |
| VendorID              | bigint                      |           |
| tpep_pickup_datetime  | timestamp without time zone |           |
| tpep_dropoff_datetime | timestamp without time zone |           |
| passenger_count       | bigint                      |           |
| trip_distance         | double precision            |           |
| RatecodeID            | bigint                      |           |
| store_and_fwd_flag    | text                        |           |
| PULocationID          | bigint                      |           |
| DOLocationID          | bigint                      |           |
| payment_type          | bigint                      |           |
| fare_amount           | double precision            |           |
| extra                 | double precision            |           |
| mta_tax               | double precision            |           |
| tip_amount            | double precision            |           |
| tolls_amount          | double precision            |           |
| improvement_surcharge | double precision            |           |
| total_amount          | double precision            |           |
| congestion_surcharge  | double precision            |           |
+-----------------------+-----------------------------+-----------+
Indexes:
    "ix_yellow_taxi_data_index" btree (index)

Time: 0.107s
root@localhost:ny_taxi>
It works like a charm!
📩 Insert the data into the table
We will insert the NYC taxi trips data into the SQL table we created in the previous section. Since there are many records, we don't want to load the entire file into memory. Instead, let's load and insert the file in chunks, where each chunk contains 100,000 rows. For this, we need to read the data again, this time to get an iterator object by using the iterator flag on the .read_csv() method, and specifying the chunk size.
df_iter = pd.read_csv(
    'yellow_tripdata_2021-01.csv',
    iterator=True,
    chunksize=100_000
    parse_dates=['tpep_pickup_datetime', 'tpep_dropoff_datetime'],
)
To check how long it takes to load each chunk, we will use the time module, and to insert the data, we will use the .to_sql() dataframe method again, but appending the records instead of replacing them this time.
for chunk in df_iter:
    t_start = time()
    chunk.to_sql(name='yellow_taxi_data', con=engine, if_exists='append')
    t_end = time()
    print(f'inserted another chunk..., took {t_end - t_start:.3f} seconds')
Which inserts the records and prints
inserted another chunk..., took 11.964
inserted another chunk..., took 11.978
inserted another chunk..., took 13.053
inserted another chunk..., took 14.280
inserted another chunk..., took 16.065
inserted another chunk..., took 16.407
inserted another chunk..., took 14.012
inserted another chunk..., took 12.950
inserted another chunk..., took 12.031
inserted another chunk..., took 11.837
inserted another chunk..., took 12.084
inserted another chunk..., took 11.995
inserted another chunk..., took 11.586
inserted another chunk..., took 8.686
After the inserting process is done, we can check the table with pgcli using a simple query
root@localhost:ny_taxi> SELECT count(1) FROM yellow_taxi_data;
+---------+
| count   |
|---------|
| 1369765 |
+---------+
SELECT 1
Time: 0.669s
root@localhost:ny_taxi>
📝 Summary
In this lesson, we saw how to
- Set Postgres on Docker
1.1 Reviewed things that can go wrong while setting things up, like a preexisting system-wide Postgres installation or other containers running with Postgres. - We downloaded the NYC taxi trip data for January 2021.
- Explored the structure of the CSV file and loaded it to Pandas.
- Created a table creation string from the dataframe, tailored to Postgres.
- Created the table in Postgres and inserted the records in chunks.
- Explored the results with pgcli

In our next lesson, we will create a network of Docker containers and set up pgAdmin to access the NYC taxi trip data.
