

✍️ Week 1 lesson 4 of DataTalksClub 2022 data engineering zoomcamp, turn notebook 📓 into script 📜, and run it with Docker 🗳️
Today, we will follow DataTalksClub's video: DE Zoomcamp 1.2.4 - Dockerizing the Ingestion Script.
Which is part of the DataTalksClub 2022 Data engineering Zoomcamp week 1 repo.
In our last post, we learned how to connect containers running pgAdmin and Postgres following DataTalksClub's video: DE Zoomcamp 1.2.3 - Connecting pgAdmin and Postgres.

💬 In this lesson, we will:
- Turn our data ingestion notebook into a script that accepts parameters.
- Test the ingestion script by:
2.1 Dropping the existing table in the database.
2.2 Running the ingestion script from the localhost.
2.3 Checking that the data was inserted with the script. - Dockerize the ingestion script by adding it to a container and specifying that it should run when the container runs.
This post is part of a series. Find all the other related posts here

🐍 Turn the data ingestion notebook into a Python script
In our week 1 lesson 2 post (Ingesting NYC taxi trip data to Postgres), under the subsection "Build the table creation string (schema)", we created a Jupyter Notebook (upload-data.ipynb) to read the NYC taxi trip data, create a SQL table creation string tailored to Postgres, and insert the records. We want to turn this notebook into a Python script that takes some arguments and performs the same operations. For this, we will use the argsparse module of the standard library. Let's create a new Python file in our working directory (next to the Docker file) and name it ingest_data.py.
import argparse

if __name__ == '__main__':
    parser = argparse.ArgumentParser(description='Ingest CSV data to Postgres')

    parser.add_argument('--user', help='user name for postgres')
    parser.add_argument('--password', help='password for postgres')
    parser.add_argument('--host', help='host for postgres')
    parser.add_argument('--port', help='port for postgres')
    parser.add_argument('--db', help='database name for postgres')
    parser.add_argument('--table_name', help='name of the table where we will write results to')
    parser.add_argument('--url', help='url of the CSV file')

args = parser.parse_args() Now we can add the logic we had on upload-data.ipynb to a main() function in ingest_data.py and use the arguments captured by argsparse where needed.
import subprocess
from time import time
import argparse

from sqlalchemy import create_engine

import pandas as pd

def main(params):
    user = params.user
    password = params.password
    host = params.host
    port = params.port
    db = params.db
    table_name = params.table_name
    url = params.url

    csv_name = 'output.csv'

    # download the csv
    proc = subprocess.run([
        "wget",
        url,
        "-O",
        csv_name,
    ])
    assert proc.returncode == 0, (url, proc.returncode)

    engine = create_engine(f'postgresql://{user}:{password}@{host}:{port}/{db}')

    df_iter = pd.read_csv(
        csv_name,
        iterator=True,
        chunksize=100_000,
        parse_dates=['tpep_pickup_datetime', 'tpep_dropoff_datetime'],
    )

    first_chunk = next(df_iter)

    # Create table
    first_chunk.head(n=0).to_sql(name=table_name, con=engine, if_exists='replace')

    # Insert first chunk of data
    first_chunk.to_sql(name=table_name, con=engine, if_exists='append')

    # Insert all the other chunks of data
    for chunk in df_iter:
        t_start = time()
        chunk.to_sql(name=table_name, con=engine, if_exists='append')
        t_end = time()
        print(f'inserted another chunk..., took {t_end - t_start:.3f} seconds')


if __name__ == '__main__':
    parser = argparse.ArgumentParser(description='Ingest CSV data to Postgres')

    parser.add_argument('--user', help='user name for postgres')
    parser.add_argument('--password', help='password for postgres')
    parser.add_argument('--host', help='host for postgres')
    parser.add_argument('--port', help='port for postgres')
    parser.add_argument('--db', help='database name for postgres')
    parser.add_argument('--table_name', help='name of the table where we will write results to')
    parser.add_argument('--url', help='url of the CSV file')

    args = parser.parse_args()

main(args)🚮 Drop the current table
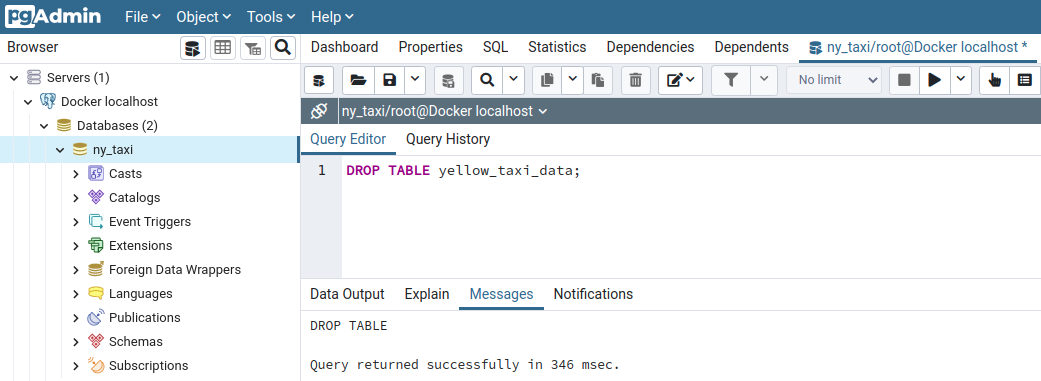
To test the ingestion script we just wrote, let's drop the current table in the database (yellow_taxi_data) and re-insert the records using the script.
sudo pkill -u postgres; restart the Postgres container with docker start -i pg-database; restart the pgAdmin container with docker start -i pgadmin; and login to pgAdmin by opening a tab in your web browser pointing to localhost:8080 and typing the credentials (admin@admin.com, root)On the pgAdmin query tool, type
DROP TABLE yellow_taxi_data;and MB1 on ▶️ the run button
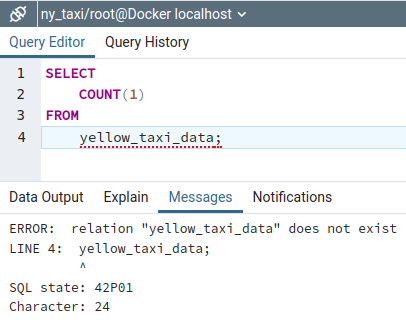
Now, if we run the row count query, we see that the table no longer exists
🏃♀️Run the ingestion script
It's showtime! Let's run the new ingestion script on a terminal window passing the required parameters. Since the download file's URL is long, let's assign it to a variable
URL="https://s3.amazonaws.com/nyc-tlc/trip+data/yellow_tripdata_2021-01.csv" and then run our ingestion script from the same terminal
python ingest_data.py \
    --user=root \
    --password=root \
    --host=localhost \
    --port=5432 \
    --db=ny_taxi \
    --table_name=yellow_taxi_data \
    --url=${URL}
which should print
python ingest_data.py \
>     --user=root \
>     --password=root \
>     --host=localhost \
>     --port=5432 \
>     --db=ny_taxi \
>     --table_name=yellow_taxi_data \
>     --url=${URL}
--2022-04-09 05:49:56--  https://s3.amazonaws.com/nyc-tlc/trip+data/yellow_tripdata_2021-01.csv
Resolving s3.amazonaws.com (s3.amazonaws.com)... 52.217.64.62
Connecting to s3.amazonaws.com (s3.amazonaws.com)|52.217.64.62|:443... connected.
HTTP request sent, awaiting response... 200 OK
Length: 125981363 (120M) [text/csv]
Saving to: ‘output.csv’

output.csv          100%[===================>] 120.14M  51.1MB/s    in 2.4s

2022-04-09 05:49:59 (51.1 MB/s) - ‘output.csv’ saved [125981363/125981363]

inserted another chunk..., took 9.164 seconds
inserted another chunk..., took 9.177 seconds
inserted another chunk..., took 10.529 seconds
inserted another chunk..., took 10.662 seconds
inserted another chunk..., took 10.078 seconds
inserted another chunk..., took 10.594 seconds
inserted another chunk..., took 10.353 seconds
inserted another chunk..., took 9.780 seconds
inserted another chunk..., took 10.006 seconds
inserted another chunk..., took 9.709 seconds
inserted another chunk..., took 9.139 seconds
sys:1: DtypeWarning: Columns (6) have mixed types.Specify dtype option on import or set low_memory=False.
inserted another chunk..., took 8.988 seconds
inserted another chunk..., took 5.795 seconds
In this case, we connect from the host system (localhost) to the Postgres container to interact with the database.
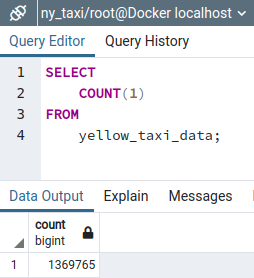
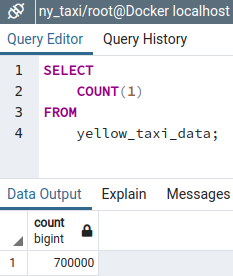
✅ Check the data was inserted with the script
Now we can use pgAdmin to check if the ingestion script worked. In pgAdmin's left side panel, MB2 on public > Refresh, to retrieve the changes
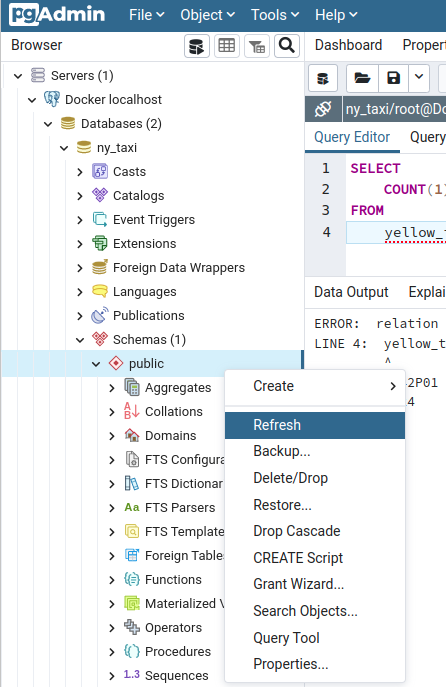
and then use the query tool to count the number of records
🗳️ Dockerize script
Now we need to update the Dockerfile to use our ingest_data.py script.
FROM python:3.9.1

RUN apt-get install wget

RUN pip install pandas sqlalchemy psycopg2

WORKDIR /app

COPY ingest_data.py ingest_data.py

ENTRYPOINT [ "python", "ingest_data.py" ]
Note that we install our script's dependencies in the container (wget, sqlalchemy, and psycopg2). Next, we need to build a new version of the container by typing in a terminal
docker build -t taxi_ingest:v001 .which shows this message when it runs successfully
docker build -t taxi_ingest:v001 .
Sending build context to Docker daemon  965.2MB
Step 1/6 : FROM python:3.9.1
 ---> 2a93c239d591
Step 2/6 : RUN apt-get install wget
 ---> Using cache
 ---> 476ab8a8c601
Step 3/6 : RUN pip install pandas sqlalchemy psycopg2
 ---> Using cache
 ---> 2f67b99758d6
Step 4/6 : WORKDIR /app
 ---> Using cache
 ---> 0c6a79d458f3
Step 5/6 : COPY ingest_data.py ingest_data.py
 ---> a472e9b933e1
Step 6/6 : ENTRYPOINT [ "python", "ingest_data.py" ]
 ---> Running in 2a59e9edfc54
Removing intermediate container 2a59e9edfc54
 ---> b83411de31ca
Successfully built b83411de31ca
Successfully tagged taxi_ingest:v001
After the container is built, we can run it by passing the parameters our ingest_data.py script accepts
docker run -it \
    --network=pg-network \
    taxi_ingest:v001 \
        --user=root \
        --password=root \
        --host=pg-database \
        --port=5432 \
        --db=ny_taxi \
        --table_name=yellow_taxi_data \
        --url=${URL}
While the Docker container runs, we can check that the data insertion process is working by using the query tool in pgAdmin
Since the instruction for defining the table in our ingestion script replaces any existing table with the same name, all the records are re-inserted from scratch.
📝 Summary
In this post we:
- Turned our data ingestion notebook into a script that accepts parameters.
- Tested the ingestion script by:
2.1 Dropping the existing table in the database.
2.2 Running the ingestion script from the localhost.
2.3 Checking that the data was inserted with the script. - Dockerized the ingestion script by adding it to a container and specifying that it should run when the container runs.

In our next lesson, we will create a Docker Compose YML file to simplify keeping track of each container configuration.
